The Different EQ bands and What they mean (part 2)

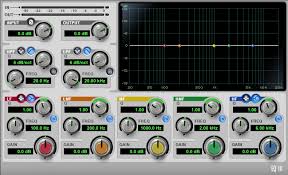
Dyn3 7-band EQ (Avid Pro Tools free plugin)

If you look toward the bottom of the EQ pictured above, you will notice 5 different bands: 1. LF, low frequency, red; 2. LMF, low-mid frequency, orange; 3. MF, mid frequency, yellow; 4. HMF, high-mid frequency, green; 5. HF, high frequency, blue.

In today’s blog I will talk about these five bands. I want to start with band 1 and 5. These are typically used and referred to as “shelves.” Band 1, low frequencies, is the low shelf, and band 5, high frequencies, is the high shelf.

But these two bands each have two different settings. The small left icon, next to the LF and HF, is called a bell-type EQ. It kind of looks like -o-. This will either boost or cut a section of frequencies set by you with the frequency knob. The ‘Q’ knob will determine how wide or narrow the bell curve will be. A low Q setting will give you a wide band of frequencies, and a high Q will render a narrow band of frequencies. A good rule of thumb is wide when boosting and narrow when cutting.

The typical use for this is to, say, boost the lower frequencies to bring out a kick drum or synth bass. On the high end, with the HF knob, we can boost upper ‘air’ frequencies to make guitars or vocals stand out or sound brighter. Of course, we can also cut in these frequency ranges as well.

The other icon setting is called a ‘shelf.’ This is the more common use for these two bands. Typically we use a boost here (low or high). When boosted, it looks just like a “shelf.” If on the low shelf, we set the frequency knob to 125 Hz, then everything from 125 on down (to 20 Hz) is boosted the same amount. On the high shelf, we might add a shelf for vocals starting at 6 kHz. In this case everything from 6 k up will have a boost. Of course, we can also cut using a shelf, but this happens less often then a boost.

The Q factor is a bit more complicated and will have to be reserved for another post.

Bands 2, 3 and 4 allow for bell curve settings only. These are the same as the bell curves on bands 1 and 5. These are used for low-mid, mid, and high-mid frequencies. There are only three knobs: Frequency, Gain and Q. Frequency, of course, sets the frequency that you want to work with. Gain is volume (loudness) and can be plus (positive) or minus (negative). We might say boost 2 kHz 2 dB (2 dB) which is a positive gain. Or cut 1200 Hz 3 dB (-3 dB) which would be a negative gain.

As stated above, Q determines the amount of frequencies being altered by the EQ.

As always, I hope this helps!

And, HEY! Make it a Great day!

Tim

Compressors – What is the Knee and What does it do?

What does the knee do on a compressor?

As you get better with compressors, you will start playing with other knobs and features. One of these is the knee. The knee refers to when and how the ratio starts to change when the compressor starts to take effect. A ‘hard knee’ means the compression becomes immediately active as soon as the input signal hits the threshold. A ‘soft knee’ means the compression becomes audible more gradually. A ‘soft knee’ also means that gentle compression starts happening further below the threshold. Another way to say this is it starts acting before the signal actuall reaches the threshold setting.

Both hard- and soft-knee compression have their uses; two examples: if you want to squash a signal’s transients quickly, you’ll want hard knee compression. If you want to use a compressor to gently glue a mix together by tightening up transients, you’ll want a soft-knee compressor.

Lastly, if you have a compressor, like the Dyn3 Compressor/limiter which comes free with Pro Tools, look at the picture of the knee. It actually looks like a human knee!

As always – I hope this helps!

And…. HEY! Make it a great day!

Tim

Compressors 201 – Threshold

A compressor has a lot of knobs and settings. They can be confusing at first. In this blog I am going to talk about one of those knobs – Threshold.

A compressor is an automatic volume control. We try to make the signal somewhat the same, static. Without a compressor, we would have to do it manually, turning the signal down, then up, then down, etc. But with a compressor, it can do that job for us.

When a signal gets loud (and crosses the threshold), it turns it down. If there’s any makeup gain, it will turn the softer signals up making them louder (along with everything else, of course).

The threshold setting tells the compressor when to start working. Put a compressor on, say, a vocal track. Pay attention to the input signal on the compressor. Let’s say the input signal is -10 dB. Now set the threshold knob to -16 dB, and the Ratio 2:1. What we’re telling the compressor to do is this: Any signal that is stronger than -16 dB, I want it to compress (lower) the signal. When the signal crosses the threshold it will get cut (attenuated) in a 2 to 1 ratio. So in this scenario, the signal is coming in at -10, with the threshold set to -16 and a 2:1 ratio. This means 6 dB is going to get compressed in a 2:1 ratio. The signal will get cut down to 3 dB over. You can think 2 becomes 1, 4 becomes 2, 6 becomes 3, etc.

If the ratio was 10:1, the signal would get compressed more. The higher the number, the more the compression. If the signal crossed the threshold by 10 dB, then it would be reduced to 1 dB.

The threshold determines how much of the signal the compressor is going to affect. You can change where the threshold is set usually in two ways. Using the Dyn3 compressor/limiter, grab the orange arrow on the signal led and slide up or down. Or to the far right at the bottom, grab the threshold knob and set up or down.

TIP: If Pro Tools is your DAW, use the Dyn3 Compressor/Limiter (free). It helps to make understanding what and how a compressor works easier.

I hope this helps!

and HEY! Make it a great day!

Tim

Creating a Click Track (in Pro Tools)

Using a click track during recording is, of course, imperative. We can’t do our work if we can’t play to the beat! Luckily for us Pro Tools makes it easy to set up a click track! Just simply go to Track on the menu bar, scroll all the way to the bottom and choose Create Click Track. Pro Tools will create an auxiliary track and automatically put a metronome plugin on the track. The metronome will automatically set to the tempo (bpm) of the song.

The metronome is customizable. You can change the sounds used for beat 1 and all other beats (2, 3, 4, etc.). The volume for beat 1 can be set and the volume for all other beats can be set to something different. I usually have mine set so that beat 1 is louder than other beats and is a different sound. That makes it easy to find the downbeat while tracking.


When I set up my templates, I already have the click track set up and ready to go! Easy! And since I organize and colorize my tracks, for me, the click track is all the way to the left in the Mix window and a bright lime green. I always know where it is in the session, no matter working in the mix or edit window.

Lastly, you can save a preset of the type of click you like. On the click plug-in, select the drop-down arrow next to Preset, select Save As, and name it! That’s it!

Peace! And HEY! Make it a great day!

Tim

10 Tips for a great vocal recording

Here are ten quick tips to think about the next time you record vocals:

1)  Warm Up:

Every vocalist needs to warm up. You wouldn’t run a marathon without stretching first, would you? Vocalists should warm up for at least 15 mins. before laying down a great performance.

2)  Don’t record vocals in the morning:

No vocalist is at their best if they’ve just rolled out of bed. If possible, try to schedule the vocalist in the mid-afternoon or evening. Use mornings for setting up and testing ideas. Always try to give the vocalist plenty of notice in advance before the recording session.

3)  Comfort:

Make it your job to ensure that the vocalist has space to move, the room is at the right temperature, and there’s nice ambient lighting to help set the mood.

4) Monitoring:

Spend time getting the balance in the headphones that the vocalist wants. Add reverb to their vocal sound if they want it, and be prepared to adjust levels as the session progresses. Watch out for the vocalist drifting out of tune, this is often because they can’t hear themselves but are too polite to mention that!

5)  Be extra kind and sensitive:

Vocalists are a very sensitive breed! A lot of pressure rides on them to really deliver – on stage and in the vocal booth. One of the greater skills we can possess is the art of encouragement and support. Being able to coax amazing performances using expert direction is a real plus. Patience and confidence building are also important. The ability to keep the vocalist focused is essential. Always use tact!

6)  Phrasing:

Spend time getting the vocal phrasing right. Subtle changes can transform an OK take into something exciting. Make sure the vocalist articulates the end of words as much as the beginning: this is vital for a sense of passion and engagement. Even if some rewriting has to take place, it’s better than compromising with an awkward line.

7)  Vocal ticks:

It’s tempting to edit out breaths and other bits and pieces from the take. These details are an essential component of any vocal performance and can make your track sound more alive, no matter what your style!

8)  Choice of microphone:

Condenser microphones are generally a better choice for vocals than dynamics. A Neumann U87 or TLM 103 are good choices if you have the budget. Experienced vocalists will have their own preferences. Accommodate them if you can.

9)  Compression:

Some engineers swear by compressing a vocal on the way into the DAW. This can work, but you can’t remove compression once it has been recorded. Be sure you have tried this out with good results or you may end up ruining an otherwise perfect take. Another strategy is to set up the vocal mic with lots of headroom and just make sure to avoid any clipping if the vocalist suddenly starts getting loud. You can always add compression during mixing.

10) The room:

I saved the most important one for last! Don’t forget that your recording will only sound as good as your room. If you have any nasty resonance build up, reflective surfaces, closets without acoustical treatment, etc., then steps 1 – 9 are kind of pointless. Obviously, this would need to be taken into consideration long before any vocal tracking were to take place. You can always use something like a Reflexion Filter (by sE Electronics) or something similar to improve your space.

I hope this helps and HEY!, make it a great day!

T

Calculating File Sizes (How much hard drive space does it take to record a song?)

So . . .  you want to record a song and you’re running out of space on the computer or external hard drive? Wondering if you have enough room? Here’s how to figure out if you do have enough space:

The sample rate and bit depth of the audio you record are directly related to the size of the resulting files. In fact, you can calculate file sizes using these two parameters:

— Sample Rate x Bit Depth = Bits per second

Or, stated another way:

— Sample Rate x Bit Depth x 60 = Bits per minute

In the binary world of computers, 8 bits make a byte; 1, 024 bytes make a kilobyte (KB); and 1,024 KB make a megabyte (MB). Therefore, this equation can be restated as follows:

— (Sample Rate x Bit Depth x 60) / (8 bits per byte x 1,024 bytes per kilobyte x 1, 024 kilobytes per —  megabyte) = Megabytes (MB) per Minute

Reducing terms gives us the following:

— Sample Rate x Bit Depth / 139, 810 = MB per Minute

A lot of folks are recording these days at 44.1/ 24. That’s a sample rate of 44,100 with a bit depth of 24 bits. Here is the calculation:

— 44,100 x 24 / 139,810 = 7.57 MB per minute.

Here is a basic chart of different sample rates and bit depths:

44.1/16 bit  =  5.04 MB/minute
44.1/24 bit  =  7.57 MB/minute
48/  16 bit   =  5.49 MB/minute
48/  24 bit   =  8.24 MB/minute
88.2/16 bit  = 10.09 MB/minute
88.2/24 bit  = 15.14 MB/minute
96/  16 bit   = 10.99 MB/minute
96/  24 bit   = 16.48 MB/minute

If you figure a normal song of 3 1/2 minutes recorded at 44.1 sample rate and 24 bit, you can plan on it taking roughly 26.50 MB of disk space. I am starting to run a lot of my sessions now at 96/24 bit. So a 3 1/2 minute song is costing me 57.68 MB of hard drive space per song.

Considering that terabyte hard drives are now running close to $50 these days, all this math stuff is not nearly as important as it was just a few years ago. But I know a lot of guys who still aren’t purchasing a whole lot of TB hard drives! It’s still useful information if it’s needed in a crunch!

Hope this helps!
HEY!! Make it a great day!!

T


Timebase in Pro Tools

In Pro Tools, material (audio or midi) on a track is associated with a type of Time Scale. All track types can be set to either sample-based (for the Sample Time Scale) or tick-based (for the Bars/Beats Time Scale). Different tracks can be set to different timebases as needed.

Audio tracks are sample-based by default. This means that audio clips have absolute locations on the timeline and are tied to specific sample locations. If you change the tempo or meter the audio will not move. This is helpful, for instance, if you import an audio clip and want to build other audio or midi tracks around it and end up changing tempos or meters a few times. You don’t want to affect the original clip. 

However, MIDI and instrument tracks are tick-based by default. This means that midi clips are fixed to bar and beat positions and move relative to the sample timeline when tempo and meter changes. So if you change the tempo, the midi will either speed up or slow down accordingly. 

A good tip to keep in mind is Elastic Audio-enabled tracks can be switched to tick-based in order to automatically follow tempo changes in your session and conform to the session’s tempo map. 

And lastly, you select whether a track is sample-based or tick-based when you create it, but you can change timebases later as needed. 

Hope this helps!
Peace – and HEY make it a great day!
Tim

Powering Up Your Music Production System in the Proper Order

Did you know that it is important to power up your system and equipment in a certain order? In the early days, for me, I didn’t know that!

Because systems are typically composed of both hardware and software, preparing your system for use might involve more than simply turning your computer on and launching your DAW of choice. The larger the system, the more important it becomes to follow a specific startup sequence. Starting components out of sequence could cause a component to not be recognized, prevent the software from launching, or cause unexpected behavior.

The recommended sequence is as follows:

  1. Make sure all your equipment, including the computer, is off.
  2. Turn on any external hard drives that use external power (wait about 10 seconds for them to spin up to speed).
  3. Turn on any MIDI interfaces and MIDI devices (including any MIDI control surfaces) and synchronization peripherals.
  4. Turn on your audio interface. Wait at least 15 seconds for the audio interface to initialize.
  5. Start your computer.
  6. Turn on your audio monitoring system, if applicable.

    If your audio interface gets it’s power from the computer, it doesn’t need to be powered up in advance.

    That’s it! When you get in the habit of always starting your recording or mixing sessions this way, it will ensure that everything works properly as it should!

    Till next time – Peace!
    And, HEY, make it a great day!

    T

Recording from sound modules without effects

If you’re involved with a lot of production work and do a lot of MIDI work like I do, you record a lot of projects using your sound modules. All sound (tone) modules automatically put effects on the sounds by default (so they sound better). Even free plug-in modules that come with recording software like Pro Tools do this. So if you use Xpand, Sampletank, etc. or you use outboard gear like Roland or Motif – you’ll want to know this!


When I use my Motif-Rack, I always go to the Effects Insertion Bypass screen and turn off the reverb and chorus. I am a piano player by trade and thusly do a lot of production work which involves piano tracks. I end up recording MIDI piano tracks dry, no reverb, no chorus. And if I use anything else – percussion, strings, etc. I also record those dry – no effects.

Why? Because for one, I don’t want chorus on a lot of my tracks (which Motif-Rack puts on all sounds by default!). I only use chorus as an effect once in a while (for the keys work I do). And two, the reverbs I have available as plug-ins in my DAW are better (i.e. Waves reverbs) than what Roland or Motif is going to give me.

On Pro Tools’ free instrument software plug-ins such as Xpand and Mini Grand, they always come with reverb (hall) or chorus or some kind of effect. Xpand down at the bottom has 2 effects – fx1, fx2. (If the green light is on – they are engaged) deselect those, and use the ones that come with your software. Sampletank has a place toward the bottom to engage effects but by default does not have them on when you create an instantiation and open the software.

Try to record dry and then use other software plug-ins or hardware outboard gear for your reverb, chorus, plate, etc. Your music will sound better for it!

And, HEY, make it a great day!!
Tim

Unmount hard drives from within Pro Tools

Have you ever tried to eject a hard drive from your system that you used in a Pro Tools session while Pro Tools was still up and running? It didn’t work, did it?


Here’s the scenario and solution:

You’re working in a Pro Tools session and the client gives you a hard drive (or flash drive) to grab wav files from. So you take care of that, go to the desktop, and try to eject the hard drive (command E) since you’re done with it. You get some dialog box that says the hard drive is in use and can’t be ejected.

Now, in the old days, I always closed the Pro Tools session I was working on, closed the application, and then went and ejected the drive. I didn’t know any better. Well there’s a much better way!!

From within Pro Tools, go to the ‘Window‘ menu command on the menu bar at the top of the screen. Under Window, go to ‘Workspace‘.  On the left side it will show all hard drives on the computer. Select the one you want to eject (the client’s hard drive). Then, at the top right of that same window there is a drop down arrow (in a circle), select that. Three quarters of the way down the menu list it says ‘Unmount‘. Select it and it will unmount (eject) the hard drive!

[This is an earlier blog of mine and pertains mostly to earlier versions of Pro Tools. I had Pro Tools 8 when I wrote this.]

Awesome, right!? Knowing this little tidbit helps save time and makes you look more professional in front of the client! All in a day’s work!

And, HEY, make it a great day!
Tim